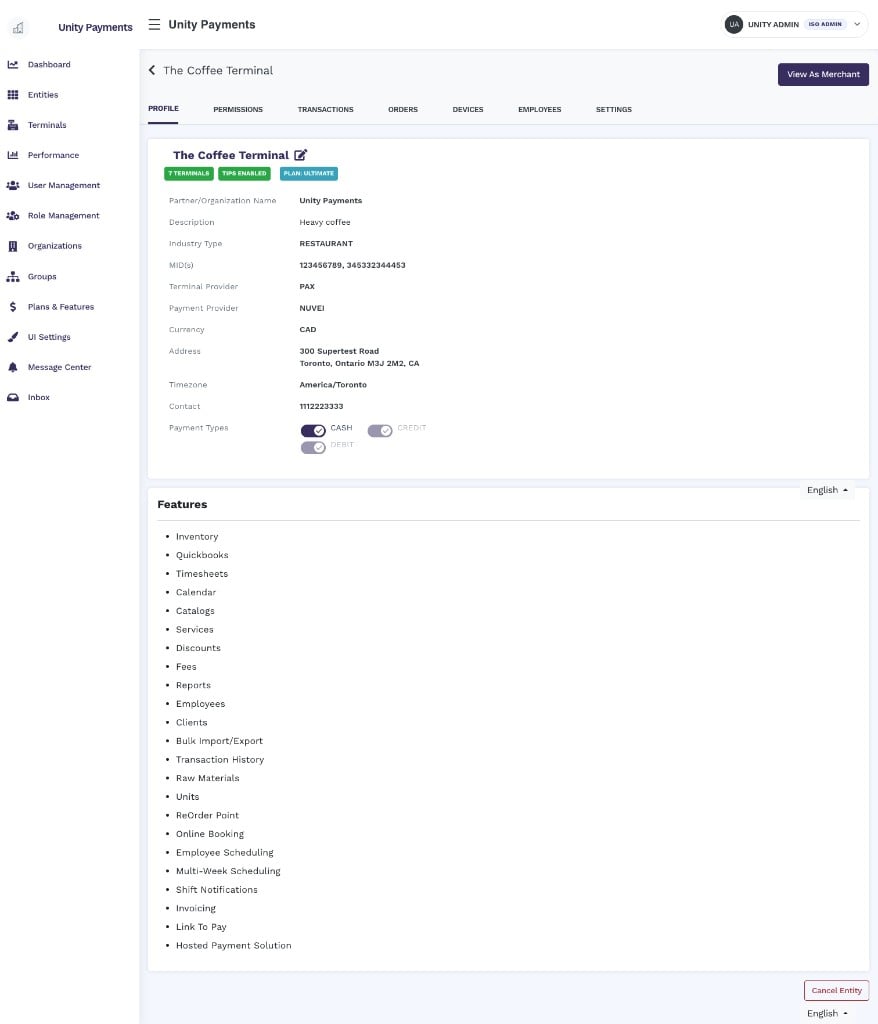
The Manage Entity — Profile tab in Taliup HQ.
The Manage Entity page has seven tabs: Profile, Permissions, Transactions, Orders, Devices, Employees, and Settings. This page documents the Profile tab only.
Page header
At the top of the page, the entity name is displayed as a back-link — clicking it returns to the Entities list. Below the name, a row of status badges summarises the entity at a glance:
The View As Merchant button in the top-right corner impersonates the merchant — the same action available from the Entities list. See View As / Impersonate for details.
Profile details
The main profile card displays a read-only summary of the entity’s configuration. Click the pencil icon next to the entity name to edit these fields — see Editing the profile below.Payment Types
The Payment Types row displays inline toggle switches for each payment type the entity supports. Each toggle saves immediately — there is no separate submit button.For entities running Poynt, Express, or any non-PAX provider, the CREDIT and DEBIT toggles will appear as disabled. Only CASH can be toggled in those configurations. EBT will not appear at all.
Open Sale Mode
This row appears only when at least one of the entity’s locations has Open Sale Only enabled. It shows a mini-table listing every location and its mode:
The label above the table also shows the count — for example, “2 of 3 Locations” — so you can see at a glance how many locations are restricted.
Poynt Credentials
This card appears only when the Terminal Provider is Poynt. It displays the Poynt integration credentials configured during entity creation:Features
Below the profile card (and the Poynt Credentials card if applicable), a Features section lists every feature enabled for this entity under its current subscription plan. Examples include Inventory, Quickbooks, Timesheets, Calendar, Catalogs, Services, Discounts, Fees, Reports, Employees, Clients, Bulk Import/Export, Transaction History, and more. The feature list is read-only. To add or remove features, update the entity’s plan in Plans & Features.Entity Timeline
The Entity Timeline panel is visible only to users with the Show Timeline permission. When shown, the page layout shifts to a two-column view — the profile occupies the left column and the timeline the right. The timeline is a chronological audit log of changes made to the entity.- Date filter — a date picker at the top of the panel. Selecting a date fetches matching activity records without a full page reload. All timestamps are stored and displayed in UTC.
- Table columns:
- Date — date on the first line; time (UTC) on the second line.
- Action — a description of the change (e.g., “Entity updated”) along with the name of the user who performed it.
Editing the profile
Click the pencil icon next to the entity name to open the Admin Update modal. The following fields can be edited:
Click Update Information to save. The modal closes on success and the profile reloads with the updated values.
Cancel Entity
The Cancel Entity button appears at the bottom-right of the page and is only visible to users with the Cancel Entities permission. Clicking the button opens a confirmation modal that lists all data that will be permanently removed or deactivated:- All users (web and app users) and their access
- Roles, permissions, and assignments
- Reports, catalogs, categories, and products (including images and inventory)
- Modifiers, taxes, discounts, fees, and raw materials
- E-commerce settings (preferences, website settings, shipping, billing, promotions, tags, etc.)
- Clients, invoices, and appointments (with time slots)
- Schedules, timesheets, and related employee data
- Media collections (logos, banners, promotional images, reports, etc.)
- Financial configurations (QuickBooks, billing token, payment types, tips, receipt config, cash discounts)
- Locations and all their payment/terminal settings
- Plans and ISO associations