> ## Documentation Index
> Fetch the complete documentation index at: https://docs.taliuphq.com/llms.txt
> Use this file to discover all available pages before exploring further.
# Enrol Taliup POS with WEB-SRM
> Enrol Taliup POS as a Revenu Québec SRS: request a certificate, register the signed-in user, then renew or delete the certificate.
Taliup POS acts as a sales recording system (SRS / MEV) for Revenu Québec's WEB-SRM. A Québec merchant cannot bill on a device until that device is enrolled and the signed-in user is registered with the WEB-SRM.
Revenu Québec requires both steps. Repeat them on every device.
If the merchant is already taking sales on Taliup POS and you are turning WEB-SRM on now, start with [Start using WEB-SRM on an existing merchant](/taliup-pos/web-srm/switch-live-merchant). That page covers the app update and the required log out / log in before enrolment.
## Before you start
* The device is set up and staff can log in. See [Taliup POS overview](/taliup-pos/index) and [PAX A920 Pro first setup](/taliup-pos/devices/pax/a920-pro).
* WEB-SRM is enabled in Taliup HQ with the merchant's Revenu Québec credentials. See [WEB-SRM settings](/taliup-hq/onboarding/web-srm).
* The device is online. The certificate request is sent to Revenu Québec.
If HQ is not configured, Taliup POS shows **This business has no WEB-SRM configuration from Taliup HQ.** Finish [WEB-SRM settings](/taliup-hq/onboarding/web-srm) before you continue.
## Enrol this device
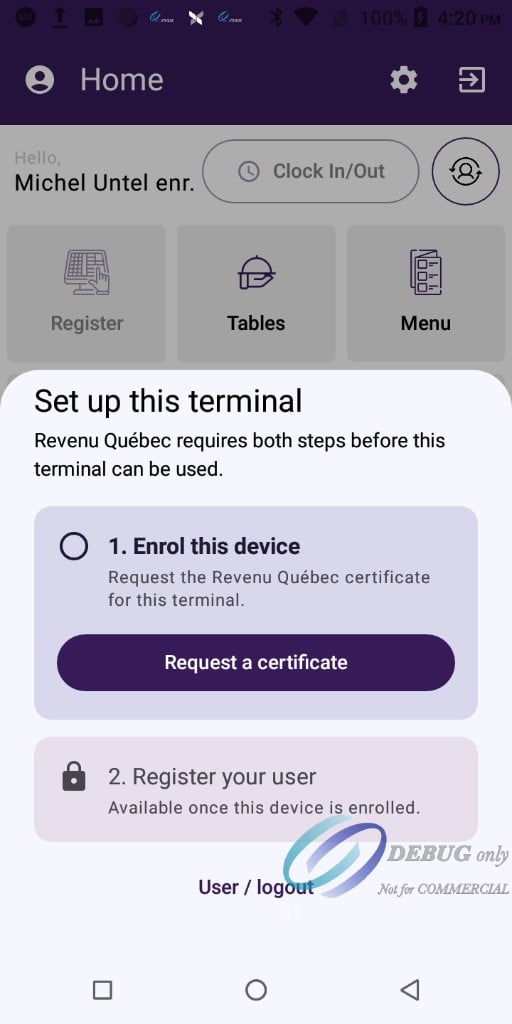
After you log in, **Enrol this device** blocks **Register**, **Tables**, and **Menu** until both steps are complete.
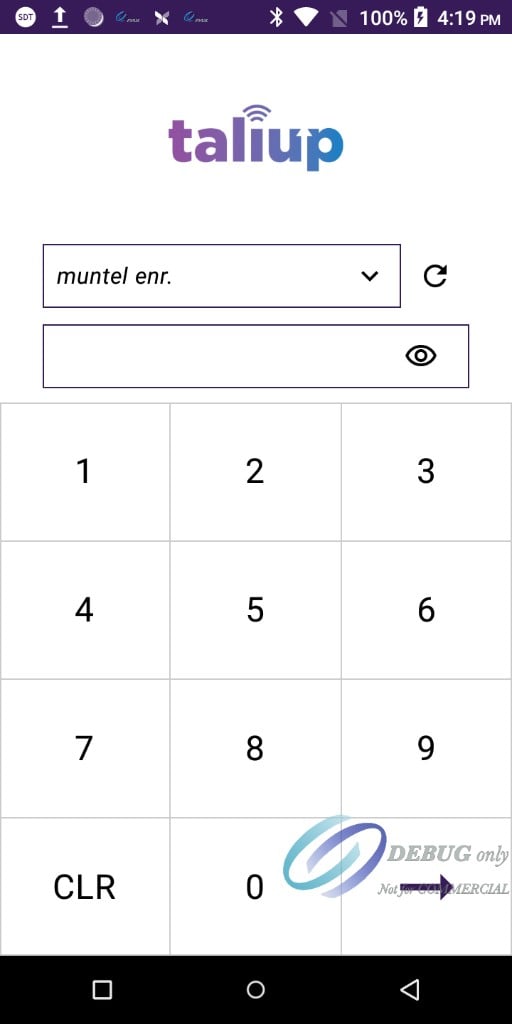
Open Taliup POS and enter the employee's six-digit passcode.
 On **Enrol this device**, tap **Request a certificate**.
Step 2, **Register your user**, stays locked until the device is enrolled.
On **Enrol this device**, tap **Request a certificate**.
Step 2, **Register your user**, stays locked until the device is enrolled.
 Enter a **Certificate nickname (SN)** of 8 to 32 characters. Use a name you can recognize later on this device.
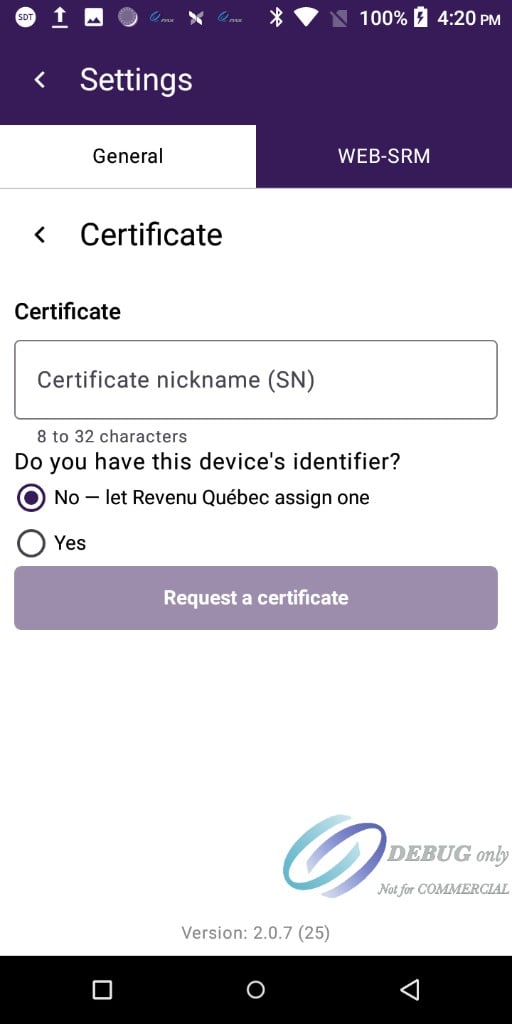 Under **Do you have this device's identifier?**:
* First-time enrolment: tap **No — let Revenu Québec assign one**.
* Restoring a device that already has an identifier: tap **Yes**, then enter the identifier in the format `XXXX-XXXX-XXXX`.
Tap **Request a certificate**. Wait until the POS shows **Certificate installed** and a **Device identifier**.
Under **Do you have this device's identifier?**:
* First-time enrolment: tap **No — let Revenu Québec assign one**.
* Restoring a device that already has an identifier: tap **Yes**, then enter the identifier in the format `XXXX-XXXX-XXXX`.
Tap **Request a certificate**. Wait until the POS shows **Certificate installed** and a **Device identifier**.
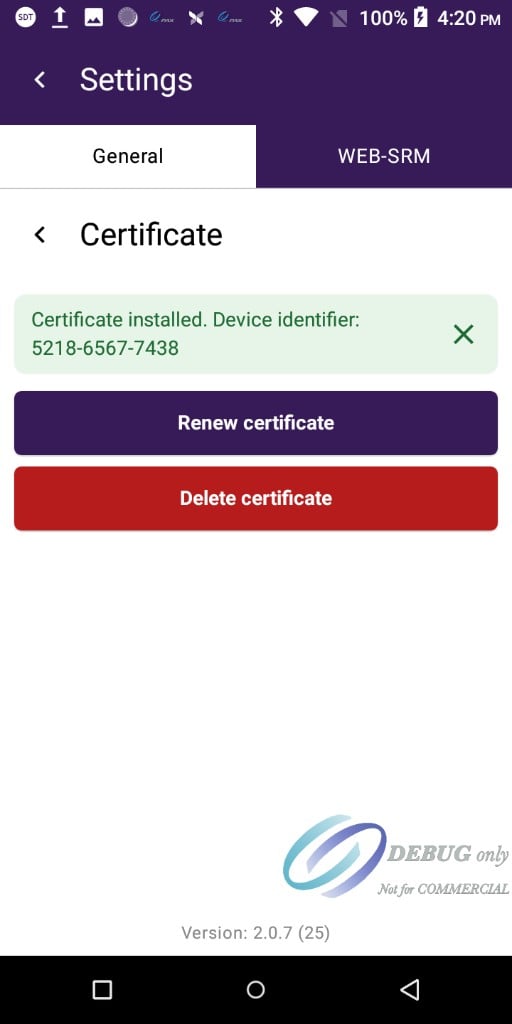 Return to the WEB-SRM setup sheet. Step 2 is now available. Tap **Register** to record the signed-in employee with the WEB-SRM.
The device can bill only after this step succeeds.
Enrolment is complete when the signed-in user is registered and **Register**, **Tables**, and **Menu** are available on Home.
## Verify enrolment
Go to **Settings** → **WEB-SRM**. The **Overview** card should show:
| Field | What it means |
| ------------------------------- | ------------------------------------------------ |
| **Status** | **Certificate installed** |
| **Device identifier (IDAPPRL)** | Identifier Revenu Québec assigned to this device |
| **Certificate name (SN)** | The nickname you entered |
| **Serial number** | Certificate serial from Revenu Québec |
| **Expires** | Certificate expiry date |
Return to the WEB-SRM setup sheet. Step 2 is now available. Tap **Register** to record the signed-in employee with the WEB-SRM.
The device can bill only after this step succeeds.
Enrolment is complete when the signed-in user is registered and **Register**, **Tables**, and **Menu** are available on Home.
## Verify enrolment
Go to **Settings** → **WEB-SRM**. The **Overview** card should show:
| Field | What it means |
| ------------------------------- | ------------------------------------------------ |
| **Status** | **Certificate installed** |
| **Device identifier (IDAPPRL)** | Identifier Revenu Québec assigned to this device |
| **Certificate name (SN)** | The nickname you entered |
| **Serial number** | Certificate serial from Revenu Québec |
| **Expires** | Certificate expiry date |
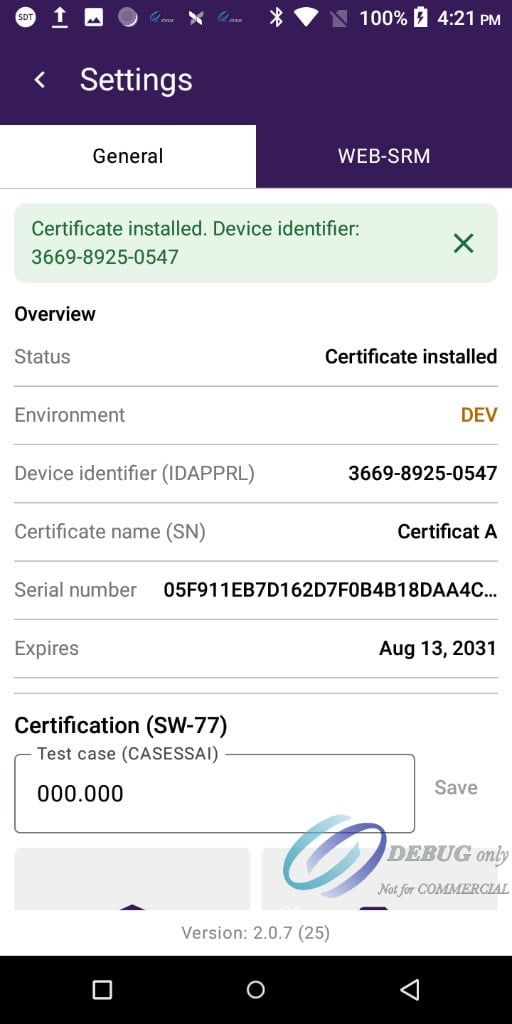 Keep a record of the **Device identifier**. You need it if you restore this device and choose **Yes** on the certificate form.
## Renew the certificate
Renew when Taliup POS warns that the certificate is expiring, or when the WEB-SRM setup sheet asks you to renew because the certificate is expired or not yet valid.
Go to **Settings** → **WEB-SRM** → **Certificate**.
Tap **Renew certificate**.
Confirm that Revenu Québec will issue a new certificate replacing the current one.
Keep a record of the **Device identifier**. You need it if you restore this device and choose **Yes** on the certificate form.
## Renew the certificate
Renew when Taliup POS warns that the certificate is expiring, or when the WEB-SRM setup sheet asks you to renew because the certificate is expired or not yet valid.
Go to **Settings** → **WEB-SRM** → **Certificate**.
Tap **Renew certificate**.
Confirm that Revenu Québec will issue a new certificate replacing the current one.
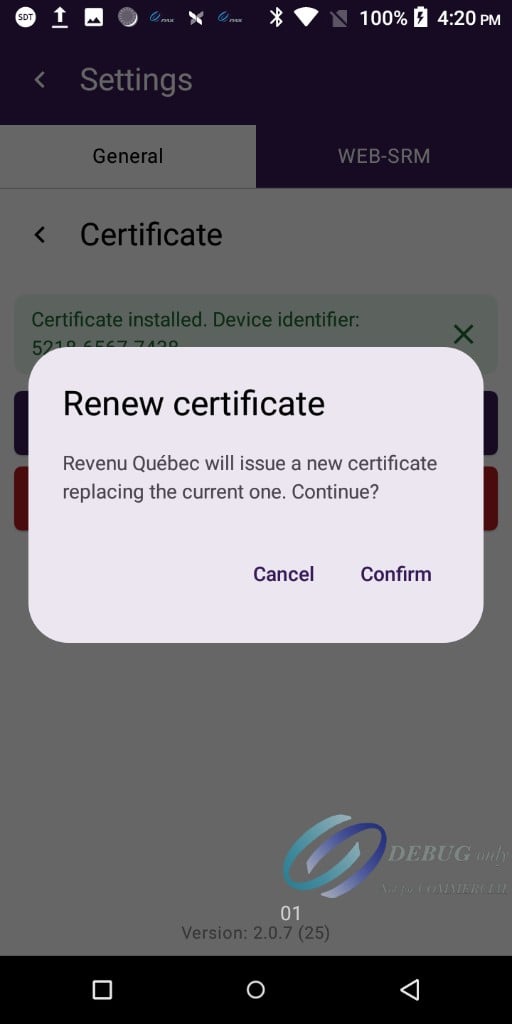 The device identifier stays the same after a successful renewal.
## Delete the certificate
Delete only when you are decommissioning the device or starting enrolment over.
Revenu Québec withdraws the certificate. The device cannot bill until you enrol it again.
Go to **Settings** → **WEB-SRM** → **Certificate**.
Tap **Delete certificate**.
Confirm the withdrawal.
The device identifier stays the same after a successful renewal.
## Delete the certificate
Delete only when you are decommissioning the device or starting enrolment over.
Revenu Québec withdraws the certificate. The device cannot bill until you enrol it again.
Go to **Settings** → **WEB-SRM** → **Certificate**.
Tap **Delete certificate**.
Confirm the withdrawal.
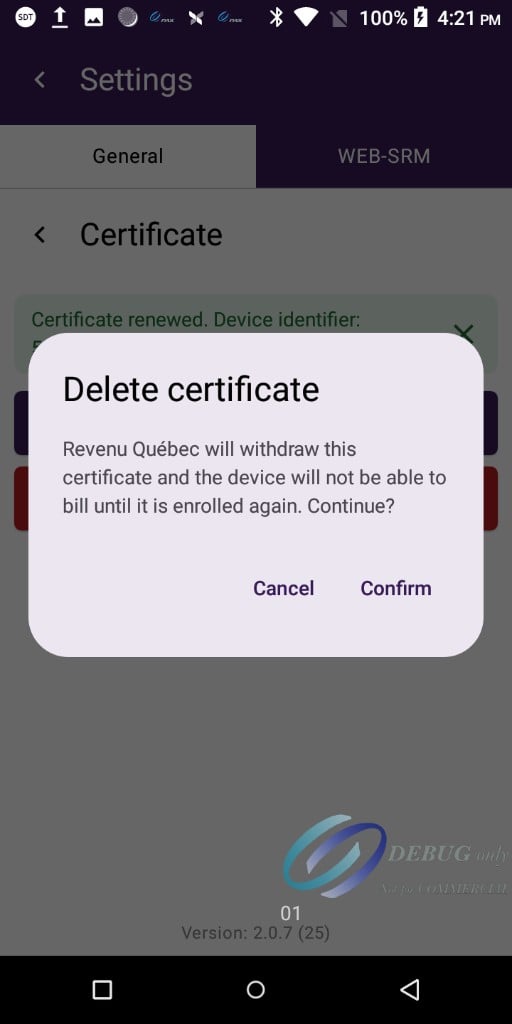 After deletion, the WEB-SRM setup sheet returns. Request a new certificate, then register the signed-in user.
## Troubleshooting
| Problem | What to try |
| ------------------------------------------------------------- | ----------------------------------------------------------------------------------------------------------------------------------------------- |
| **This business has no WEB-SRM configuration from Taliup HQ** | Enable WEB-SRM and save credentials in Taliup HQ. See [WEB-SRM settings](/taliup-hq/onboarding/web-srm). |
| **Register**, **Tables**, and **Menu** stay greyed out | Finish both enrolment steps. Step 2 stays locked until the certificate is installed. |
| Certificate request failed | Confirm the device is online and HQ credentials are correct, then tap **Request a certificate** again. The nickname must be 8 to 32 characters. |
| User registration did not complete | Tap **Register** again. The employee is recorded with the WEB-SRM only after this step succeeds. |
| Certificate renewal did not complete | Confirm the device is online, then tap **Renew certificate** again. |
| Device cannot bill after delete | Expected. Enrol the device and register the signed-in user again. |
| Restoring a previously enrolled device | On the certificate form, tap **Yes** and enter the existing device identifier as `XXXX-XXXX-XXXX`. |
After deletion, the WEB-SRM setup sheet returns. Request a new certificate, then register the signed-in user.
## Troubleshooting
| Problem | What to try |
| ------------------------------------------------------------- | ----------------------------------------------------------------------------------------------------------------------------------------------- |
| **This business has no WEB-SRM configuration from Taliup HQ** | Enable WEB-SRM and save credentials in Taliup HQ. See [WEB-SRM settings](/taliup-hq/onboarding/web-srm). |
| **Register**, **Tables**, and **Menu** stay greyed out | Finish both enrolment steps. Step 2 stays locked until the certificate is installed. |
| Certificate request failed | Confirm the device is online and HQ credentials are correct, then tap **Request a certificate** again. The nickname must be 8 to 32 characters. |
| User registration did not complete | Tap **Register** again. The employee is recorded with the WEB-SRM only after this step succeeds. |
| Certificate renewal did not complete | Confirm the device is online, then tap **Renew certificate** again. |
| Device cannot bill after delete | Expected. Enrol the device and register the signed-in user again. |
| Restoring a previously enrolled device | On the certificate form, tap **Yes** and enter the existing device identifier as `XXXX-XXXX-XXXX`. |