> ## Documentation Index
> Fetch the complete documentation index at: https://docs.taliuphq.com/llms.txt
> Use this file to discover all available pages before exploring further.
# Take payment
> Collect Pay Full or Split Amount payments with card, cash, tip prompts, and receipt options.
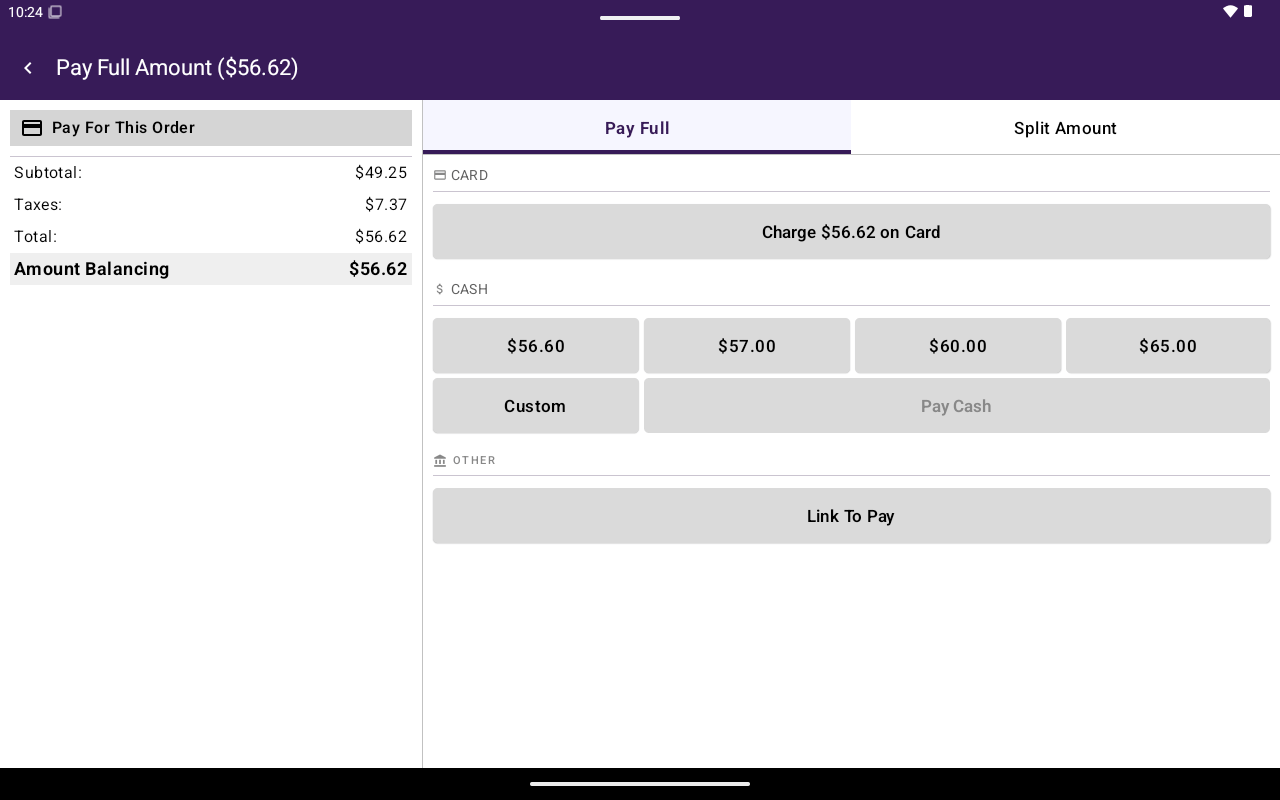
From the cart (or Open Sale **Pay**), Taliup POS opens the payment screen so you can collect the balance.
 ## How to get here
1. Build an order in Register (Open Sale or Menu/Catalog).
2. Tap **Pay**.
3. Or, on a table order, open a guest’s options and tap **Pay** to collect that guest’s balance only.
Available methods depend on what the merchant enabled (for example cash, credit, debit, EBT, Link to Pay).
## Pay Full or Split Amount
| Tab | Use it when |
| ---------------- | ------------------------------------- |
| **Pay Full** | Collecting the full remaining balance |
| **Split Amount** | Collecting part of the balance now |
On **Split Amount**, choose a preset such as **Full Amount**, **N Ways**, or **Custom**, then take payment for the selected portion. After a successful split payment you can take the **Next Payment**, or **Pay More Later**.
## Card payment
Tap the card charge option shown for your merchant (for example charge on **Card**, **Credit**, or **Debit**).
Follow the on-device prompts. If tips are enabled in Taliup HQ, the customer may see **Add a Tip** with presets, **No Tip**, or **Custom**.
Wait for approval. Taliup POS posts the payment and may prompt for receipts (see below).
Tip options are configured in Taliup HQ. See [Tips](/taliup-hq/onboarding/tips).
## Cash payment
In the **Cash** section, pick a tender preset or tap **Custom**.
On the custom keypad, confirm total sale amount, cash received, and **Change Due**. Use **Exact** for exact tender if needed, then **Pay Cash**.
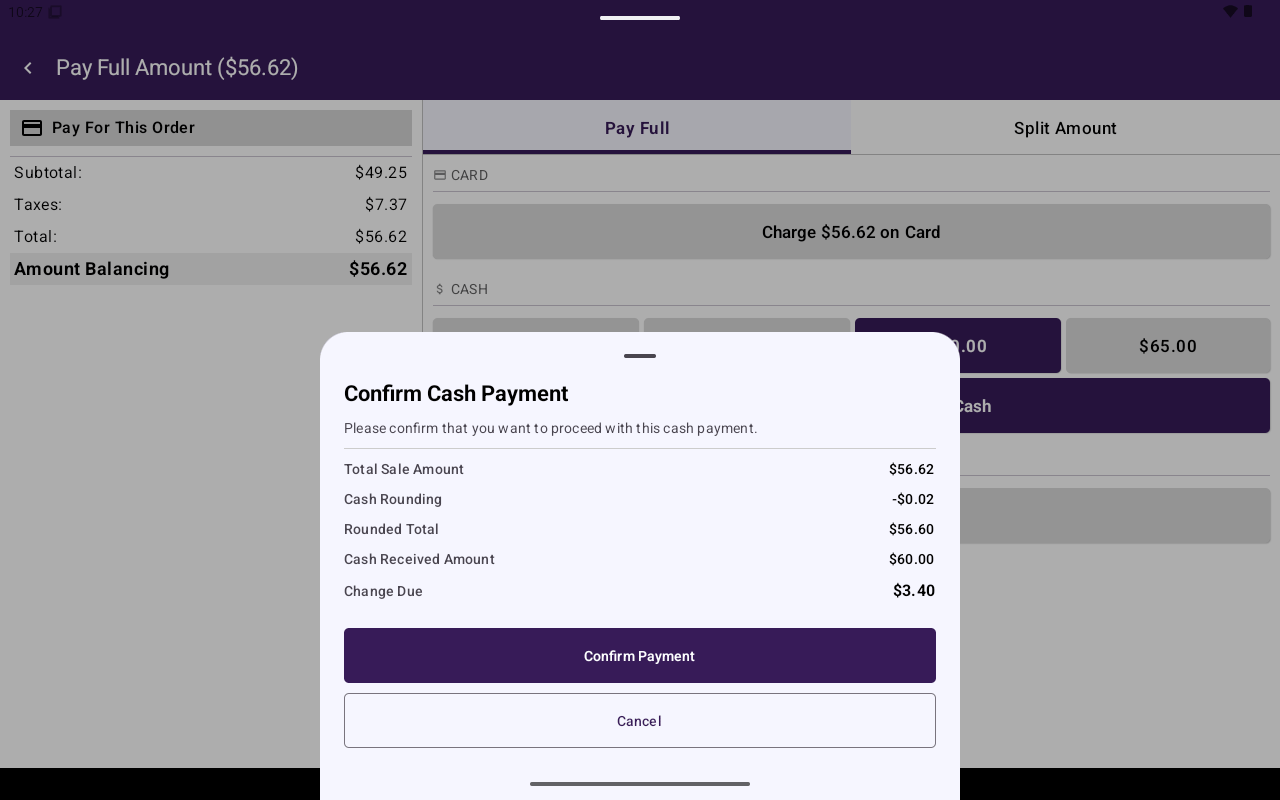
Confirm the cash payment when prompted (**Confirm Cash Payment** / **Confirm Payment**).
## How to get here
1. Build an order in Register (Open Sale or Menu/Catalog).
2. Tap **Pay**.
3. Or, on a table order, open a guest’s options and tap **Pay** to collect that guest’s balance only.
Available methods depend on what the merchant enabled (for example cash, credit, debit, EBT, Link to Pay).
## Pay Full or Split Amount
| Tab | Use it when |
| ---------------- | ------------------------------------- |
| **Pay Full** | Collecting the full remaining balance |
| **Split Amount** | Collecting part of the balance now |
On **Split Amount**, choose a preset such as **Full Amount**, **N Ways**, or **Custom**, then take payment for the selected portion. After a successful split payment you can take the **Next Payment**, or **Pay More Later**.
## Card payment
Tap the card charge option shown for your merchant (for example charge on **Card**, **Credit**, or **Debit**).
Follow the on-device prompts. If tips are enabled in Taliup HQ, the customer may see **Add a Tip** with presets, **No Tip**, or **Custom**.
Wait for approval. Taliup POS posts the payment and may prompt for receipts (see below).
Tip options are configured in Taliup HQ. See [Tips](/taliup-hq/onboarding/tips).
## Cash payment
In the **Cash** section, pick a tender preset or tap **Custom**.
On the custom keypad, confirm total sale amount, cash received, and **Change Due**. Use **Exact** for exact tender if needed, then **Pay Cash**.
Confirm the cash payment when prompted (**Confirm Cash Payment** / **Confirm Payment**).
 ## Other methods
When enabled for the merchant, the payment screen may also show:
* **EBT**
* **Link To Pay**
## After payment
Depending on settings and order type, you may see prompts such as:
1. **Send Order To Kitchen** — send items to kitchen printers. Set those printers up under [Settings → Printers](/taliup-pos/settings/printers).
2. **Customer Copy** — **Print Customer Copy Receipt?**
3. **Order Fully Paid** — print the order receipt
4. **Guest Fully Paid** — print that guest’s receipt
Receipt behavior is also controlled by [General settings](/taliup-pos/settings/general) (auto-print, skip merchant copy, skip fully paid prompts).
Completed payments appear under [Transactions](/taliup-pos/transactions).
## Related
* [Cart](/taliup-pos/register/cart)
* [Options side menu](/taliup-pos/register/options) — Create Auth, Create Refund, print bill
* [Void](/taliup-pos/transactions/void) · [Refund](/taliup-pos/transactions/refund)
## Other methods
When enabled for the merchant, the payment screen may also show:
* **EBT**
* **Link To Pay**
## After payment
Depending on settings and order type, you may see prompts such as:
1. **Send Order To Kitchen** — send items to kitchen printers. Set those printers up under [Settings → Printers](/taliup-pos/settings/printers).
2. **Customer Copy** — **Print Customer Copy Receipt?**
3. **Order Fully Paid** — print the order receipt
4. **Guest Fully Paid** — print that guest’s receipt
Receipt behavior is also controlled by [General settings](/taliup-pos/settings/general) (auto-print, skip merchant copy, skip fully paid prompts).
Completed payments appear under [Transactions](/taliup-pos/transactions).
## Related
* [Cart](/taliup-pos/register/cart)
* [Options side menu](/taliup-pos/register/options) — Create Auth, Create Refund, print bill
* [Void](/taliup-pos/transactions/void) · [Refund](/taliup-pos/transactions/refund)