> ## Documentation Index
> Fetch the complete documentation index at: https://docs.taliuphq.com/llms.txt
> Use this file to discover all available pages before exploring further.
# Register
> Ring up sales in Taliup POS — Open Sale, Menu/Catalog, cart, payment, and the Options side menu.
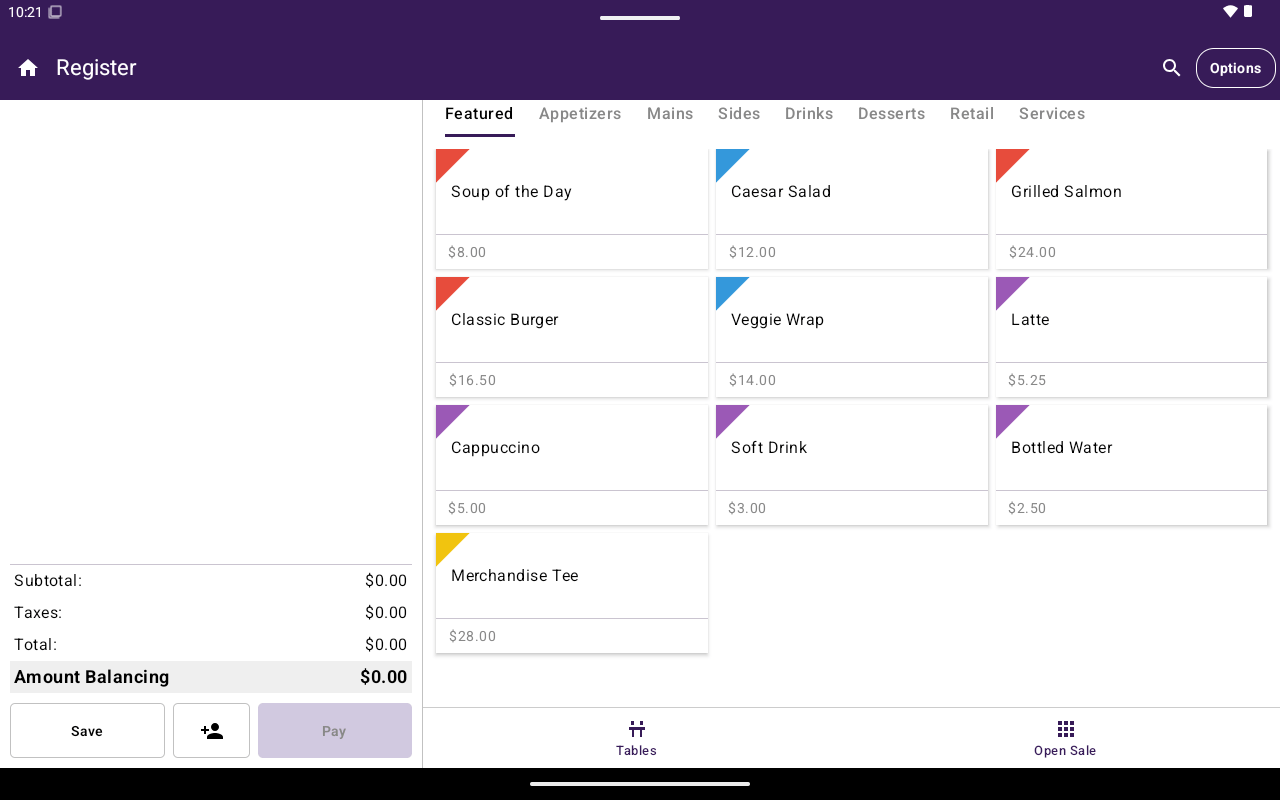
**Register** is where staff build an order and take payment. Open it from the Home screen.
 ## What’s on the screen
| Area | Purpose |
| ---------------------- | ---------------------------------------------------------------- |
| **Open Sale** | Keypad for a custom amount |
| **Menu** / **Catalog** | Pick sellable items (label depends on industry type) |
| **Cart** | Review line items and totals |
| **Pay** | Start the payment flow |
| **Options** | Side menu for bills, discounts, order actions, kitchen, and more |
Restaurants see **Menu**; other industry types see **Catalog**. If the catalog feature is not available for the merchant, Register stays on **Open Sale** only.
### Layout notes
* In portrait, use the bottom navigation to switch views and open **Cart** or **Pay**.
* In landscape, the cart often stays visible beside the keypad or item picker.
* Switching between Open Sale and Menu/Catalog while the cart has items shows a warning that the cart will be cleared.
## Typical paths
Enter an amount on the keypad → **Pay** → choose card or cash. See [Open a sale](/taliup-pos/register/open-sale) and [Take payment](/taliup-pos/register/take-payment).
Add items → review [Cart](/taliup-pos/register/cart) → **Pay**. See [Add items](/taliup-pos/register/add-items).
Start from [Tables](/taliup-pos/tables), then continue in Register. Table-only tools appear under [Options](/taliup-pos/register/options) (print individual bills, complete order, move order, and more).
## In this section
Charge a custom amount from the keypad.
Add Menu or Catalog items to the cart.
Edit items, guests, and totals before payment.
Pay Full or Split Amount — card, cash, and more.
Print bills, auth, refund, discounts, save order, kitchen, scanner.
## What’s on the screen
| Area | Purpose |
| ---------------------- | ---------------------------------------------------------------- |
| **Open Sale** | Keypad for a custom amount |
| **Menu** / **Catalog** | Pick sellable items (label depends on industry type) |
| **Cart** | Review line items and totals |
| **Pay** | Start the payment flow |
| **Options** | Side menu for bills, discounts, order actions, kitchen, and more |
Restaurants see **Menu**; other industry types see **Catalog**. If the catalog feature is not available for the merchant, Register stays on **Open Sale** only.
### Layout notes
* In portrait, use the bottom navigation to switch views and open **Cart** or **Pay**.
* In landscape, the cart often stays visible beside the keypad or item picker.
* Switching between Open Sale and Menu/Catalog while the cart has items shows a warning that the cart will be cleared.
## Typical paths
Enter an amount on the keypad → **Pay** → choose card or cash. See [Open a sale](/taliup-pos/register/open-sale) and [Take payment](/taliup-pos/register/take-payment).
Add items → review [Cart](/taliup-pos/register/cart) → **Pay**. See [Add items](/taliup-pos/register/add-items).
Start from [Tables](/taliup-pos/tables), then continue in Register. Table-only tools appear under [Options](/taliup-pos/register/options) (print individual bills, complete order, move order, and more).
## In this section
Charge a custom amount from the keypad.
Add Menu or Catalog items to the cart.
Edit items, guests, and totals before payment.
Pay Full or Split Amount — card, cash, and more.
Print bills, auth, refund, discounts, save order, kitchen, scanner.