> ## Documentation Index
> Fetch the complete documentation index at: https://docs.taliuphq.com/llms.txt
> Use this file to discover all available pages before exploring further.
# User Management
> View, edit, and manage all admin users across your ISO and its child organizations — including status filtering, profile edits, password resets, and user deletion.
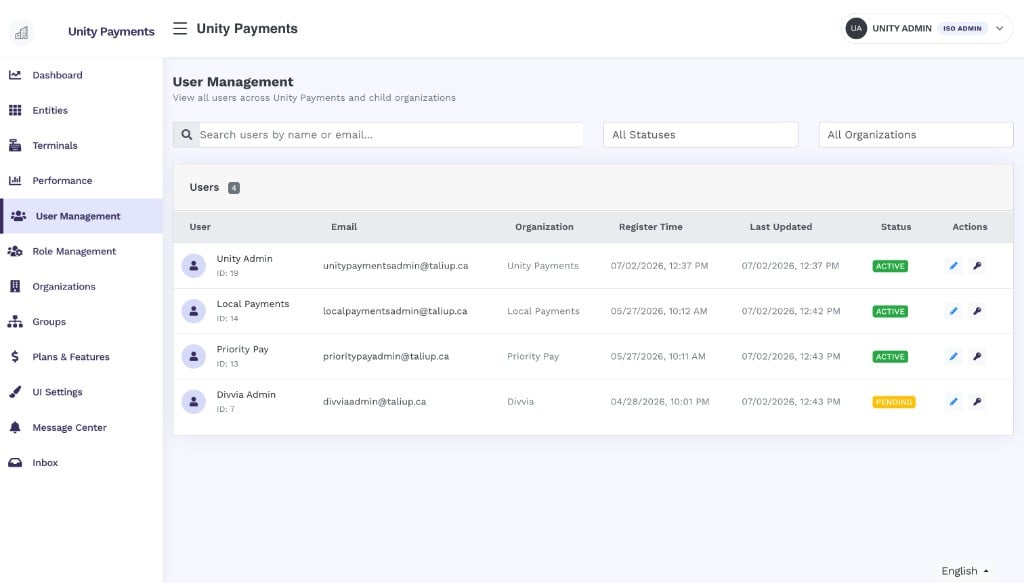
The **User Management** page gives ISO admins a flat, paginated view of every admin user across their organization and all child ISOs. From here you can search and filter users, edit their profile, send password reset invitations, and delete accounts.
 This page requires the **User Management** permission. Users without an ISO association receive a 403. You can only view and manage users who belong to your ISO or a child ISO — users from outside your hierarchy are not accessible.
***
## Filters
This page requires the **User Management** permission. Users without an ISO association receive a 403. You can only view and manage users who belong to your ISO or a child ISO — users from outside your hierarchy are not accessible.
***
## Filters
 | Filter | Description |
| ---------------- | ----------------------------------------------------------------------------------------------------- |
| **Search** | Live search (debounced) across first name, last name, and email address. |
| **Status** | Filter by account status: All Statuses, Active, Pending, or Inactive. |
| **Organization** | Filter to a specific ISO or child ISO. Defaults to showing users across all accessible organizations. |
***
## User table
The table lists 20 users per page, newest first. Each row shows:
| Column | Contents |
| ----------------- | --------------------------------------------------------------------------------------------------------------------------------------------------------------- |
| **User** | Full name and internal user ID. |
| **Email** | Primary email address. |
| **Organization** | The ISO the user belongs to. Falls back to the root ISO name when no child ISO is set. |
| **Register Time** | Account creation timestamp. |
| **Last Updated** | Most recent profile change. |
| **Status** | **Active** (green) — account is in good standing. **Pending** (yellow) — invitation accepted but setup not complete. **Inactive** (grey) — account is disabled. |
| **Actions** | Edit profile (pencil) and Send Password Reset (key). |
***
## Creating a user
New admin users are created through the **Role Management** page using the Invite User flow. You cannot create a user directly from this page.
When you invite a user, you assign them a role at the time of creation. The new account is created with a **Pending** status and the user receives an invitation email with a secure link to set their password and activate their account.
Step-by-step instructions for creating a new user and assigning them a role.
***
## Editing a user
Click the **pencil** icon on any user row to open the Edit User Profile page.
| Filter | Description |
| ---------------- | ----------------------------------------------------------------------------------------------------- |
| **Search** | Live search (debounced) across first name, last name, and email address. |
| **Status** | Filter by account status: All Statuses, Active, Pending, or Inactive. |
| **Organization** | Filter to a specific ISO or child ISO. Defaults to showing users across all accessible organizations. |
***
## User table
The table lists 20 users per page, newest first. Each row shows:
| Column | Contents |
| ----------------- | --------------------------------------------------------------------------------------------------------------------------------------------------------------- |
| **User** | Full name and internal user ID. |
| **Email** | Primary email address. |
| **Organization** | The ISO the user belongs to. Falls back to the root ISO name when no child ISO is set. |
| **Register Time** | Account creation timestamp. |
| **Last Updated** | Most recent profile change. |
| **Status** | **Active** (green) — account is in good standing. **Pending** (yellow) — invitation accepted but setup not complete. **Inactive** (grey) — account is disabled. |
| **Actions** | Edit profile (pencil) and Send Password Reset (key). |
***
## Creating a user
New admin users are created through the **Role Management** page using the Invite User flow. You cannot create a user directly from this page.
When you invite a user, you assign them a role at the time of creation. The new account is created with a **Pending** status and the user receives an invitation email with a secure link to set their password and activate their account.
Step-by-step instructions for creating a new user and assigning them a role.
***
## Editing a user
Click the **pencil** icon on any user row to open the Edit User Profile page.
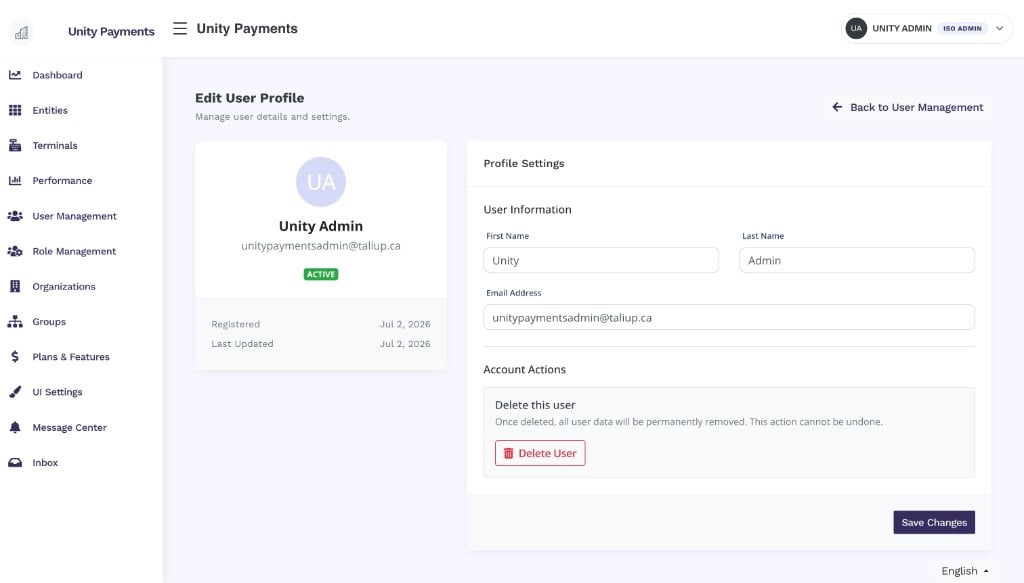 The left panel shows the user's current name, email, status badge, and registration/last-updated dates as a read-only reference. The right panel has two sections:
### User information
| Field | Notes |
| ----------------- | ----------------------------------------------------------------------------------------- |
| **First Name** | Required. |
| **Last Name** | Required. |
| **Email Address** | Required. Must be unique — cannot be set to an address already in use by another account. |
Click **Save Changes** to apply. On success you are returned to the User Management list.
### Deleting a user
The **Account Actions** section at the bottom of the edit page contains the **Delete User** button.
Deleting a user is permanent. All user data is removed, roles and permissions are unlinked, and the action cannot be undone. You cannot delete your own account — the system will reject the request if you attempt to do so.
***
## Sending a password reset
Click the **key** icon on any user row to open the Send Password Reset Invitation modal.
The left panel shows the user's current name, email, status badge, and registration/last-updated dates as a read-only reference. The right panel has two sections:
### User information
| Field | Notes |
| ----------------- | ----------------------------------------------------------------------------------------- |
| **First Name** | Required. |
| **Last Name** | Required. |
| **Email Address** | Required. Must be unique — cannot be set to an address already in use by another account. |
Click **Save Changes** to apply. On success you are returned to the User Management list.
### Deleting a user
The **Account Actions** section at the bottom of the edit page contains the **Delete User** button.
Deleting a user is permanent. All user data is removed, roles and permissions are unlinked, and the action cannot be undone. You cannot delete your own account — the system will reject the request if you attempt to do so.
***
## Sending a password reset
Click the **key** icon on any user row to open the Send Password Reset Invitation modal.
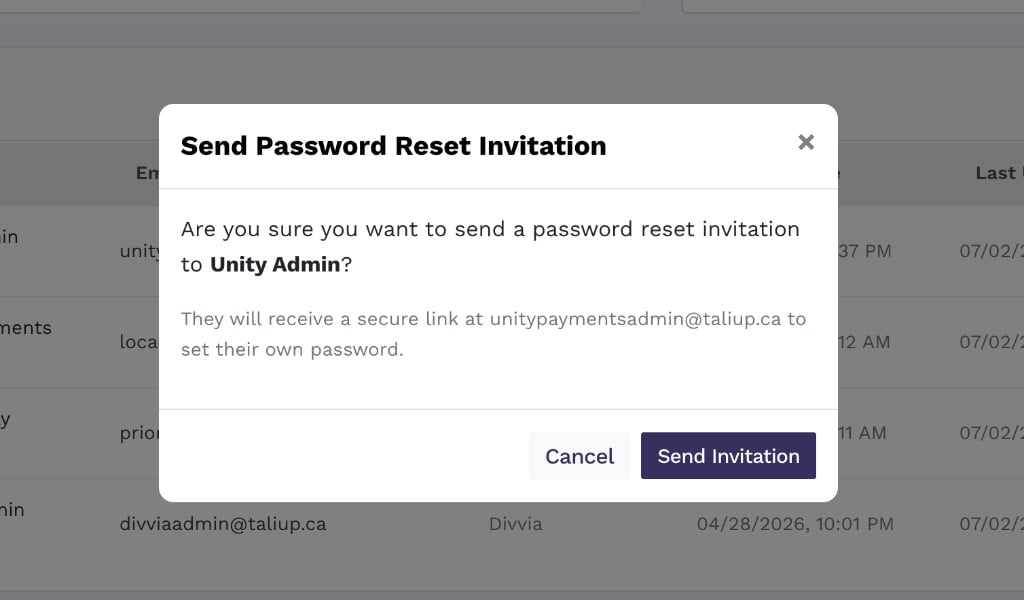 Confirm by clicking **Send Invitation**. The user receives an email with a secure, one-time link to set their own password. The invitation is sent to the email address currently on record for that account.
If the email fails to send (for example, due to a mail configuration issue), an error message is shown and no changes are made to the user's account.
***
## Organization user management
Clicking into a specific organization from the **Organizations** section opens an organization-level user management view. This view has two tabs:
### Users tab
Lists the users assigned to that specific organization. From here you can manage individual user assignments, roles, and access within the scope of that organization.
### Admin Role Permissions tab
Configures which permissions are granted to the Admin role for that organization. Changes here affect all users holding the Admin role within the organization immediately.
The organization-level user management view is separate from the ISO-wide User Management page. Use the ISO-wide page for a cross-organization overview, and the organization-level view when you need to manage users or permissions scoped to a single child organization.
Confirm by clicking **Send Invitation**. The user receives an email with a secure, one-time link to set their own password. The invitation is sent to the email address currently on record for that account.
If the email fails to send (for example, due to a mail configuration issue), an error message is shown and no changes are made to the user's account.
***
## Organization user management
Clicking into a specific organization from the **Organizations** section opens an organization-level user management view. This view has two tabs:
### Users tab
Lists the users assigned to that specific organization. From here you can manage individual user assignments, roles, and access within the scope of that organization.
### Admin Role Permissions tab
Configures which permissions are granted to the Admin role for that organization. Changes here affect all users holding the Admin role within the organization immediately.
The organization-level user management view is separate from the ISO-wide User Management page. Use the ISO-wide page for a cross-organization overview, and the organization-level view when you need to manage users or permissions scoped to a single child organization.