> ## Documentation Index
> Fetch the complete documentation index at: https://docs.taliuphq.com/llms.txt
> Use this file to discover all available pages before exploring further.
# Role Management
> Create and manage roles within your ISO, assign feature permissions, invite users into roles, and control access across your organization.
The **Role Management** page lets ISO admins define roles, control which features each role can access, and invite users into those roles. Every role is scoped to your ISO — roles you create here are not visible to other ISOs.
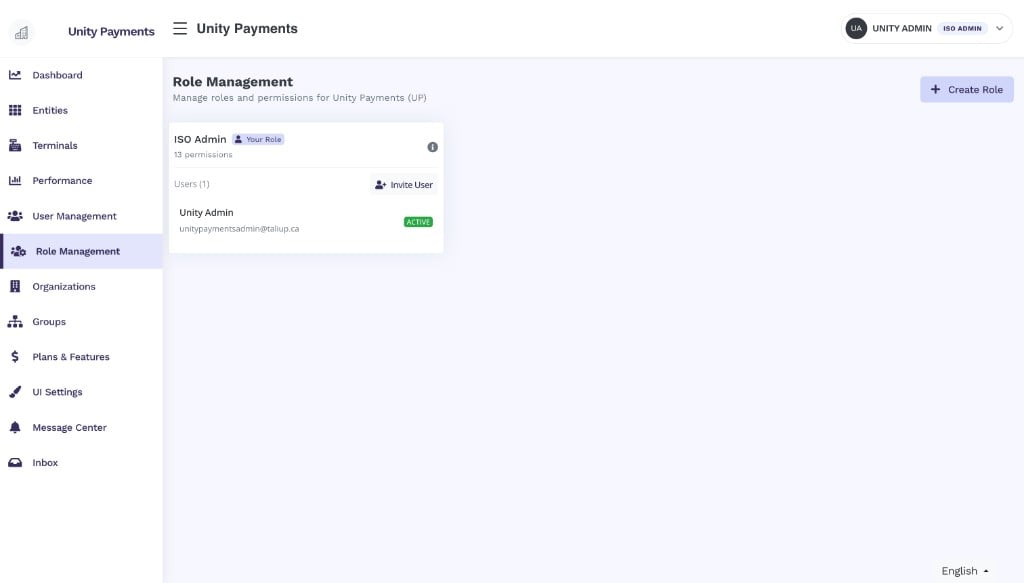 This page requires the **Role Management** permission. Your own active role is labelled **Your Role** and cannot be edited or deleted — this prevents accidental self-lockout. Only custom roles you have created can be modified or removed.
***
## Role cards
Each role appears as a card on the page. A card shows:
* **Role name** — with a **Your Role** badge if it is the role currently assigned to you
* **Permission count** — the number of feature permissions granted to this role
* **Users list** — every user assigned to this role, with their name, email, and status badge (Active or Pending)
* **Invite User** button — opens the invitation modal pre-set to this role
* **Edit / Delete** controls — visible only on custom roles you are permitted to modify
***
## Creating a role
Click **+ Create Role** in the top-right corner to open the Create New Role modal.
This page requires the **Role Management** permission. Your own active role is labelled **Your Role** and cannot be edited or deleted — this prevents accidental self-lockout. Only custom roles you have created can be modified or removed.
***
## Role cards
Each role appears as a card on the page. A card shows:
* **Role name** — with a **Your Role** badge if it is the role currently assigned to you
* **Permission count** — the number of feature permissions granted to this role
* **Users list** — every user assigned to this role, with their name, email, and status badge (Active or Pending)
* **Invite User** button — opens the invitation modal pre-set to this role
* **Edit / Delete** controls — visible only on custom roles you are permitted to modify
***
## Creating a role
Click **+ Create Role** in the top-right corner to open the Create New Role modal.
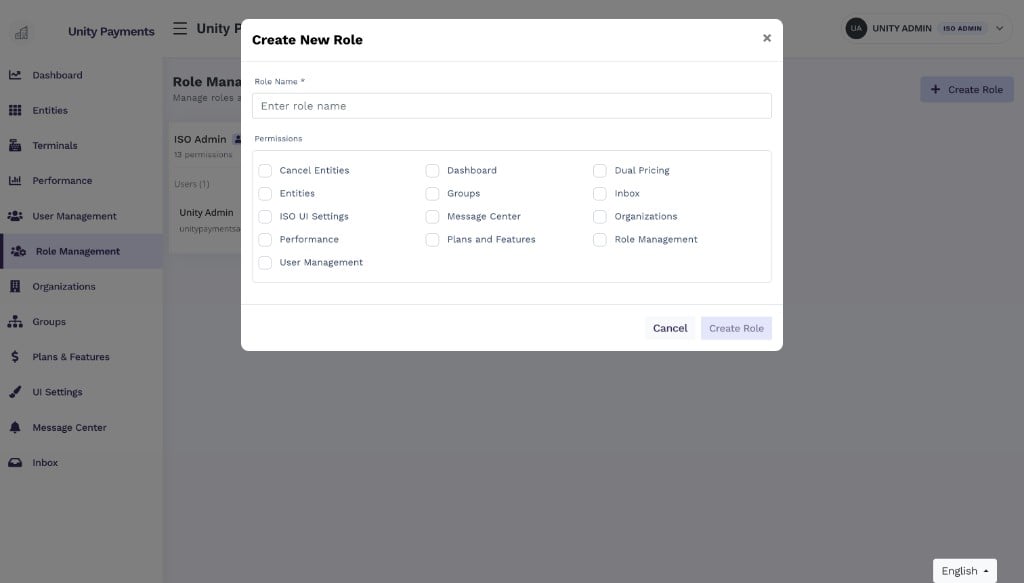 | Field | Notes |
| --------------- | -------------------------------------------------------------------------------------------------------------------------- |
| **Role Name** | Required. Must be unique within your ISO. |
| **Permissions** | Select one or more permissions from the list below. A role with no permissions can still be created and assigned to users. |
Click **Create Role** to save. The new role card appears on the page immediately.
### Available permissions
| Permission | What it gates |
| ---------------------- | ----------------------------------------------- |
| **Dashboard** | Access to the Admin Dashboard page |
| **Entities** | View and manage merchant entities |
| **Performance** | Generate and download performance reports |
| **User Management** | View and manage users across the ISO hierarchy |
| **Role Management** | Create, edit, and delete roles and invite users |
| **Groups** | Manage merchant groups |
| **Plans and Features** | Manage plans and feature flags |
| **Organizations** | View and manage child ISO organizations |
| **ISO UI Settings** | Configure ISO-level UI customisation settings |
| **Message Center** | Access the Message Center |
| **Inbox** | Access the Inbox |
| **Cancel Entities** | Cancel merchant entities |
| **Dual Pricing** | Manage dual pricing configuration |
***
## Editing and deleting a role
Roles you created (custom roles) show **Edit** and **Delete** controls on their card. Built-in roles such as **ISO Admin** and your own current role are protected and cannot be modified.
When you edit a role's permissions, the system immediately rebuilds the permission cache for every user holding that role — their access updates without requiring them to log out.
Deleting a role is permanent. All users assigned to that role will lose the permissions it granted. Assign users to a different role before deleting if you need them to retain access.
***
## Inviting a user
Click **Invite User** on any role card to open the Invite New User modal. The **Assign Role** field is pre-set to the role whose card you clicked.
| Field | Notes |
| --------------- | -------------------------------------------------------------------------------------------------------------------------- |
| **Role Name** | Required. Must be unique within your ISO. |
| **Permissions** | Select one or more permissions from the list below. A role with no permissions can still be created and assigned to users. |
Click **Create Role** to save. The new role card appears on the page immediately.
### Available permissions
| Permission | What it gates |
| ---------------------- | ----------------------------------------------- |
| **Dashboard** | Access to the Admin Dashboard page |
| **Entities** | View and manage merchant entities |
| **Performance** | Generate and download performance reports |
| **User Management** | View and manage users across the ISO hierarchy |
| **Role Management** | Create, edit, and delete roles and invite users |
| **Groups** | Manage merchant groups |
| **Plans and Features** | Manage plans and feature flags |
| **Organizations** | View and manage child ISO organizations |
| **ISO UI Settings** | Configure ISO-level UI customisation settings |
| **Message Center** | Access the Message Center |
| **Inbox** | Access the Inbox |
| **Cancel Entities** | Cancel merchant entities |
| **Dual Pricing** | Manage dual pricing configuration |
***
## Editing and deleting a role
Roles you created (custom roles) show **Edit** and **Delete** controls on their card. Built-in roles such as **ISO Admin** and your own current role are protected and cannot be modified.
When you edit a role's permissions, the system immediately rebuilds the permission cache for every user holding that role — their access updates without requiring them to log out.
Deleting a role is permanent. All users assigned to that role will lose the permissions it granted. Assign users to a different role before deleting if you need them to retain access.
***
## Inviting a user
Click **Invite User** on any role card to open the Invite New User modal. The **Assign Role** field is pre-set to the role whose card you clicked.
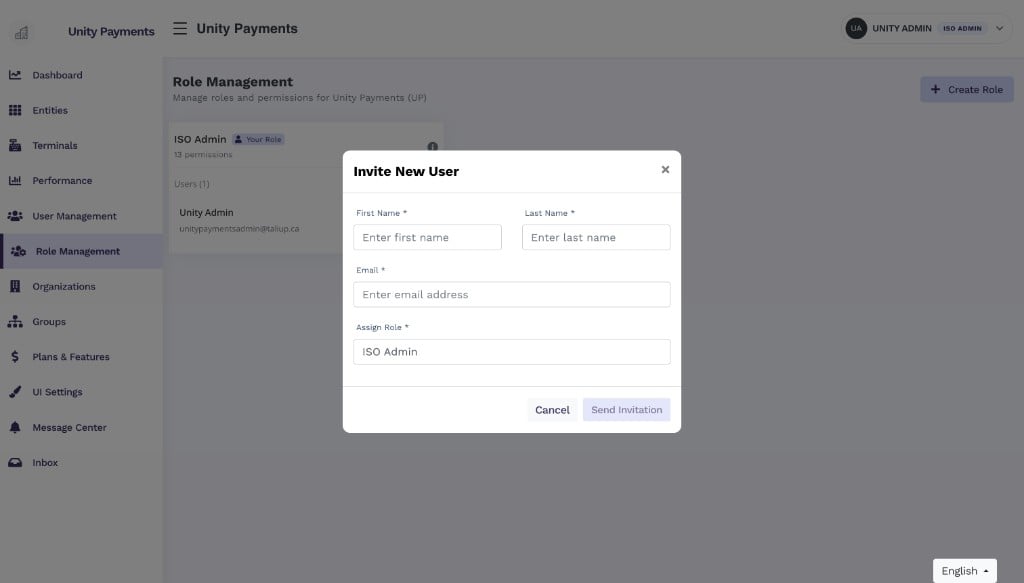 | Field | Notes |
| --------------- | -------------------------------------------------------------------------------------- |
| **First Name** | Required. |
| **Last Name** | Required. |
| **Email** | Required. Must be unique — cannot match an existing account. |
| **Assign Role** | Required. Pre-set to the role card you clicked; can be changed to any accessible role. |
Click **Send Invitation** to create the account and dispatch the invitation email. The new user appears in the role card with a **Pending** status badge. They will receive an email with a secure link to complete their account setup and set their password.
***
## Managing existing users
Each user listed on a role card has the following actions available:
| Action | Description |
| --------------------- | ----------------------------------------------------------------------------------------------------------------------------------------- |
| **Edit** | Update the user's first name, last name, email address, or assigned role. |
| **Reset password** | Sends a password reset invitation email. The user receives a secure one-time link to set a new password. Only available for Active users. |
| **Resend invitation** | Re-sends the original invitation email. Only available for users still in **Pending** status. |
| **Remove user** | Detaches all roles and permissions and permanently deletes the user account. |
Removing a user is permanent — all roles, permissions, and account data are deleted and cannot be recovered. You cannot remove your own account.
| Field | Notes |
| --------------- | -------------------------------------------------------------------------------------- |
| **First Name** | Required. |
| **Last Name** | Required. |
| **Email** | Required. Must be unique — cannot match an existing account. |
| **Assign Role** | Required. Pre-set to the role card you clicked; can be changed to any accessible role. |
Click **Send Invitation** to create the account and dispatch the invitation email. The new user appears in the role card with a **Pending** status badge. They will receive an email with a secure link to complete their account setup and set their password.
***
## Managing existing users
Each user listed on a role card has the following actions available:
| Action | Description |
| --------------------- | ----------------------------------------------------------------------------------------------------------------------------------------- |
| **Edit** | Update the user's first name, last name, email address, or assigned role. |
| **Reset password** | Sends a password reset invitation email. The user receives a secure one-time link to set a new password. Only available for Active users. |
| **Resend invitation** | Re-sends the original invitation email. Only available for users still in **Pending** status. |
| **Remove user** | Detaches all roles and permissions and permanently deletes the user account. |
Removing a user is permanent — all roles, permissions, and account data are deleted and cannot be recovered. You cannot remove your own account.